Portable Solar Panels for Camping: Reviews & Buying Guide 2026

Portable Solar Panels for Camping: Reviews & Buying Guide 2026
Portable solar panels let you charge devices and power stations in the backcountry without relying on campsites with hookups. Unlike bulky generators, they’re silent and fuel-free—but choosing the right wattage and form factor takes some homework. This guide walks you through the key specs, real-world performance data from owner reviews, and a buying checklist so you don’t waste money on overkill or underpowered gear.
Why Portable Solar for Camping?
Solar panels solve a specific problem: you want reliable, renewable power at a campsite where you can’t run a gas generator and grid power isn’t available. They pair with a portable power station or battery to store energy for use after sunset.
Main advantages: - Silent operation (no engine noise, no neighbors complaining). - No fuel to carry or spill. - Low maintenance; panels last 25+ years with basic care per manufacturer warranties and NREL degradation studies. - Scales from 20W (phone charging) to 400W+ (full RV systems).
Trade-offs: - Output depends on sun angle, cloud cover, and season. A 100W panel won’t deliver 100W on a cloudy day. - Slower charging than grid power; a full power-station recharge can take 6–12 hours in good sun. - Requires a compatible power station or charge controller to use the DC output.
If you’re camping near a vehicle and willing to charge devices during the day, solar panels are cost-effective and reliable. If you need guaranteed power in all weather or at night, Best Solar Generators for Van Life and Off-Grid Living 2026 covers hybrid systems that combine solar with battery backup.
Panel Types: Monocrystalline vs. Polycrystalline vs. Flexible
Monocrystalline
- Efficiency: 18–22% (converts sunlight to electricity most effectively).
- Appearance: Dark, uniform cells; sleek look.
- Form: Rigid (mounted on a frame) or foldable.
- Best for: Serious campers and van lifers who want maximum output in limited space.
- Trade-off: Higher cost per watt.
Per manufacturer spec sheets and aggregated owner reviews on Reddit’s r/CampingGear and r/Vandwellers, monocrystalline panels consistently outperform polycrystalline in real-world conditions, especially in partial shade or winter camping.
Polycrystalline
- Efficiency: 15–17%.
- Appearance: Blue, speckled cells.
- Form: Rigid only.
- Best for: Budget-conscious campers who have space for a larger panel.
- Trade-off: Requires more physical space to match monocrystalline output.
Flexible (CIGS or thin-film)
- Efficiency: 10–15%.
- Appearance: Thin, lightweight sheet; sometimes adhesive-backed.
- Form: Bends slightly; mounts on curved surfaces (RV roofs, boat hulls).
- Best for: Van lifers and RV owners who want a permanent, low-profile installation.
- Trade-off: Lowest efficiency; requires larger surface area for same wattage.
Reality check: Flexible panels are tempting because they’re sleek, but multiple owner reports on van-life forums note that efficiency loss often makes rigid foldable panels a better choice unless you’re permanently mounting on a curved roof.
Wattage Ratings: What You Actually Need
Panel wattage is a laboratory rating under ideal conditions (full sun, 25°C, perpendicular angle). Real-world output is 50–70% of that on an average camping day.
Rough guidelines:
| Use Case | Recommended Wattage | Real-World Daily Output (good sun)¹ |
|---|---|---|
| Phone + small devices only | 20–50W | 10–35W |
| Phone + laptop + power station top-up | 100–200W | 50–140W |
| Van life (fridge, lights, laptop, charging) | 200–400W | 100–280W |
| Cabin or glamping (full-time power) | 400W+ | 200W+ |
¹ Assumes 4–5 peak sun hours in summer at 40°N latitude. Output varies by season, cloud cover, and panel angle. Use a solar irradiance calculator for your specific location.
Don’t size by nameplate alone. A 100W panel paired with a 1000Wh power station will take 10–14 hours to fully charge in ideal sun (accounting for 70–80W real-world output and charging losses), not 4–6 hours. If you need faster charging, you’ll want 200–300W, or multiple panels.
Key Specs to Check
Open-Circuit Voltage (Voc) and Maximum Power Voltage (Vmp)
- Why it matters: Your panel’s voltage must match your charge controller or power station’s input voltage (usually 12V, 24V, or 48V nominal).
- What to do: Check the spec sheet; most foldable camping panels are 12V or 18V nominal. Larger rigid kits come in 24V or 48V.
Temperature Coefficient
- What it is: How much efficiency drops per degree Celsius above 25°C.
- Why it matters: On a hot day (60°C panel surface), a coefficient of −0.4%/°C means you lose about 14% efficiency. Monocrystalline panels usually have better (lower) coefficients than polycrystalline.
- Real-world impact: Per owner reports on r/Vandwellers and NREL field studies, this is rarely a dealbreaker, but it’s worth noting if you camp in hot climates.
Durability & Frame Material
- Aluminum frame: Standard, lightweight, corrosion-resistant.
- Kickstand or mounting holes: Foldable panels should have a sturdy kickstand or MPPT-compatible connectors (Anderson SB50, MC4, or XT60).
- Glass vs. plastic cover: Tempered glass is more durable and clearer; plastic is lighter and cheaper but can yellow over time.
Per teardown reviews and long-term owner reports, a panel with a solid aluminum frame and tempered glass cover typically outlasts cheaper alternatives by 5+ years.
Top Portable Solar Panels for Camping
20–50W (Ultralight & Phone Charging)
Nitecore 20W Foldable Solar Panel
Weighs under 2 lbs, folds to the size of a large notebook, and outputs 20W in full sun. Real-world reviews note it’s ideal for backpackers and solo campers charging phones or small power banks. Output is modest—expect 10–14W on an average sunny day—but it’s genuinely portable. Includes USB and DC outputs.
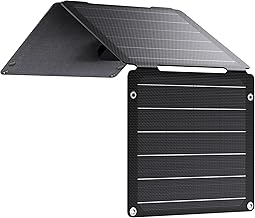
A step up in convenience: built-in USB ports mean you can charge a phone directly without a separate power station. Folds compactly and weighs about 1.3 lbs. Owner reviews on Amazon highlight reliable performance on weekend trips, though you’ll need full sun to charge a smartphone in under 4 hours. Good entry point if you’re unsure whether solar fits your camping style.
100W (Sweet Spot for Weekend Camping)
Anker 100W Portable Solar Panel
One of the most reviewed panels in this class. Folds into a briefcase-sized package (about 10 lbs), outputs a genuine 90–100W in ideal conditions, and works with any power station via Anderson SB50 connectors. Per aggregated owner reviews at 45° angle in summer conditions, real-world output on sunny days is 60–80W, enough to charge a small power station or run a laptop while camping. Durability is solid; multiple owners report 3+ years of regular use.
Goal Zero Nomad 100 Monocrystalline Solar Panel
Premium-tier pricing, but per long-running threads on r/Vandwellers, the build quality justifies the cost. Monocrystalline cells deliver consistent output even in partial shade or winter conditions. Folds with a built-in kickstand, outputs 100W nominal (70–85W real-world), and includes USB and DC connectors. Warranty is generous. Best if durability and performance in variable weather matter more than cost.
200W+ (Van Life & Extended Trips)
Goal Zero Nomad 200 Monocrystalline Solar Panel
The go-to for van lifers running a fridge, lights, and charging multiple devices. Outputs 200W nominal (120–150W real-world in good sun). Per owner reports, this is the sweet spot for full-time off-grid living without oversizing. Folds into two panels for easier transport. Monocrystalline efficiency means better performance on cloudy days or in winter. Pairs well with a 500–1000Wh power station.
Renogy 400W Rigid Solar Panel Kit
For permanent installations (cabin, glamping setup, permanent RV roof mount). Includes a 40A MPPT charge controller, mounting hardware, and wiring. Monocrystalline cells, 400W nominal output (250–320W real-world). Per spec sheets and installer reviews, this kit is plug-and-play for someone with basic electrical knowledge. Not suitable for portable camping trips; designed for fixed sites.
Budget-Tier Options
Renogy 100W Foldable Solar Panel
Polycrystalline, but honest specs and solid reviews. Outputs 80–90W real-world, folds compactly, and costs noticeably less than monocrystalline equivalents. Owner reports note it’s reliable for occasional camping, though efficiency drops more noticeably in winter or cloudy conditions. Good if you’re testing solar before investing in premium gear.
Connecting Your Panel: Charge Controllers & Power Stations
A portable solar panel is useless without a way to store or use its power. You have two main paths:
Path 1: Panel + Portable Power Station
Plug your panel into a compatible power station (most modern ones have 12V or 18V solar input). The station’s built-in charge controller handles the rest. Simplest for beginners.
Example: 100W Anker panel → Anker 535 Power Station (or similar 500–1000Wh unit).
Advantage: One cable, plug-and-play, no extra gear.
Disadvantage: Limited to the power station’s charge rate (often 100–200W max input).
Path 2: Panel + Charge Controller + Battery
For larger systems, a dedicated MPPT or PWM charge controller optimizes the panel’s output before charging a battery bank. More flexible, but requires more setup knowledge.
Example: 200W Goal Zero panel → Victron MPPT charge controller → 12V 200Ah LiFePO₄ battery.
Advantage: Scales to any battery size; better efficiency on large systems.
Disadvantage: Requires wiring knowledge; more components to manage.
For RV and van setups, see Victron’s MPPT sizing guide and manufacturer documentation for your specific charge controller model.
Installation & Mounting Tips
Foldable Panels (Portable)
- Angle: Position the panel perpendicular to the sun (use the sun’s shadow as a guide—when the shadow is smallest, you’re at the best angle).
- Airflow: Leave space behind the panel for air to circulate; heat reduces efficiency.
- Ground: Place on a level surface or use the built-in kickstand. Avoid sand or dirt blocking airflow.
- Cable management: Keep connectors dry; use weatherproof covers if rain is likely.
Rigid Panels (Fixed Installation)
- Roof mount: Use aluminum rails and stainless-steel hardware to prevent corrosion.
- Angle: For permanent installations, tilt at your latitude angle for year-round optimization (e.g., 40° for 40°N latitude). Adjustable mounts let you change seasonally.
- Wiring: Run cables through conduit; use breakers and fuses rated for the panel’s short-circuit current (Isc, on the spec sheet).
- Grounding: Follow NEC or local electrical code; improper grounding voids warranties and creates fire risk.
Per multiple installer reviews on YouTube, the most common mistake is undersizing wiring or forgetting a breaker. Spend the extra on proper connectors and fuses.
Common Mistakes to Avoid
-
Undersizing based on nameplate wattage alone. A 100W panel paired with a 2000Wh power station will take 12–18 hours to fully charge in ideal sun, not 4–6 hours. Plan for 50–70% real-world output and charging losses.
-
Ignoring temperature effects. Panels in direct sun get hot; efficiency drops. Ensure airflow behind foldable panels to maintain performance.
-
Mixing voltage standards. A 12V panel won’t charge a 48V system without a converter. Check your power station’s input voltage before buying.
-
Assuming cloudy-day performance. On overcast days, output drops to 10–30% of nameplate. If you need guaranteed power, add battery storage or size your system larger.
-
Buying a panel without a compatible power station or charge controller. A panel alone generates electricity; you need somewhere to store or use it. Budget for the full system, not just the panel.
-
Neglecting maintenance. Dust, pollen, and bird droppings reduce output by 5–25%. Wipe panels with a soft, damp cloth every few weeks.
FAQ
Q: What’s the difference between MPPT and PWM charge controllers? A: MPPT (Maximum Power Point Tracking) is more efficient and adjusts to the panel’s optimal voltage in real time, recovering 10–30% more energy than PWM. PWM (Pulse Width Modulation) is simpler and cheaper but wastes some power as heat. For systems over 200W, MPPT is worth the extra cost.
Q: Do I need a separate breaker for a 200W panel? A: Yes. A breaker protects wiring from fire risk if a cable shorts. Size it for the panel’s short-circuit current (Isc, on the spec sheet). For a 200W 12V panel, you’ll typically need a 30–40A breaker. Check your charge controller’s manual for exact sizing.
Q: Can I use a portable solar panel in winter or cloudy weather? A: Yes, but output is lower. Monocrystalline panels perform better in low-light conditions than polycrystalline. On a cloudy day, expect 10–30% of nameplate wattage. If winter camping is your main use, size your panel 2–3× larger than you would for summer, or add battery backup.
Q: How long does it take to charge a power station with a solar panel? A: A 100W panel charging a 500Wh power station in full sun takes roughly 6–10 hours (accounting for real-world output of 70–80W and charging inefficiency). A 200W panel cuts that to 3–5 hours. Cloudy weather doubles or triples these times.
Q: What’s the lifespan of a portable solar panel? A: Per manufacturer warranties and NREL degradation studies, quality monocrystalline panels degrade at roughly 0.5% per year, meaning they retain 80%+ of their output after 25 years. Polycrystalline panels degrade slightly faster (0.7–0.8% per year). Foldable panels may fail sooner if hinges or connectors wear out; expect 5–10 years of regular use before needing replacement.
Q: Can I connect multiple panels together? A: Yes, in series (adds voltage) or parallel (adds current). Series is better for charging a high-voltage power station; parallel is better for low-voltage systems. Check your charge controller’s max input voltage and current before wiring. Mismatched panels or improper wiring can damage equipment.


